ansible-web-wm
![]()
Automated deployment and security of a web server using Ansible
- This project is also available in the Czech version: README.md
Project information
This project serves for automated installation and configuration of a web server using Ansible. It includes:
- Roles for Nginx, Fail2ban, firewall, SSH and automatic updates
- Using
ansible-vaultfor the secure storage of passwords - Playbooks and scripts
provision.shfor easy deployment The project is based on static-web-test, created in the Replit environment, and was significantly enhanced with security features, automation, and system management. The project was fully tested — provisioning was completed without errors, all services were successfully validated.
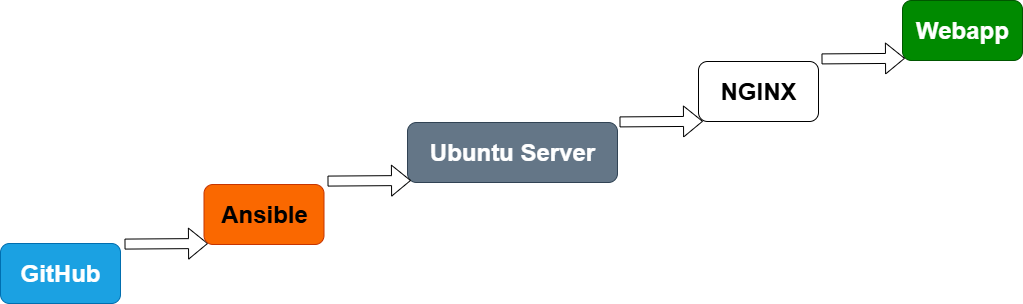
Project: Ansible Web Server ansible-web-wm
Comprehensive automation of Linux servers using Ansible, focused on:
- security configuration (
firewall,fail2ban,ssh) - automatic system updates
- creation of a dedicated user
webapp - deployment of a simple web server
- using
ansible-vaultfor encrypting sensitive data
Requirements for the environment
- Python 3.8+
- Ansible 2.10+
- Linux server or VM with SSH access
- Vault password for encrypted variables
- Properly configured file
inventory/hosts.ini - Installed
sudo(for running withbecome: true)
Project launch
- Optional: Cloning the repository
If you haven’t downloaded the repository yet:
git clone https://github.com/Miska296/ansible-web-wm.git cd ansible-web-wm - Setting the paths to roles (already prepared in provision.sh):
export ANSIBLE_ROLES_PATH="./roles" - Starting the provisioning:
./provision.sh - After launching, enter the password for the Vault when prompted.
- Check the functionality of the web server:
Open in your browser
http://localhostor the corresponding IP address — a page with the text should be displayed: Hello from GitHub! This file was uploaded by Michaela for Ansible testing.
Ansible Vault — Safe storage of password
- The sensitive password has been encrypted using
ansible-vault:ansible-vault encrypt group_vars/web/vault - Variable:
webapp_password: "tajneheslo123" - Used in the role of
users: ```yaml- name: Create dedicated user webapp with password from Vault user: name: webapp password: “” shell: /bin/bash state: present ```
- The vault is explicitly loaded in the playbook:
```yaml
vars_files:
- ../group_vars/web/vault ```
Additional safety features
fail2banis installed and activated: ```yaml- name: Enable fail2ban service service: name: fail2ban enabled: true ```
- SSH is secured (e.g. disabling root login)
- The firewall protects the server and only allows necessary ports (e.g., 22, 80)
Project structure
Root directory ansible-web-wm:
- inventory/hosts.ini
- playbooks/webserver.yml
- roles/users
- roles/webserver
- roles/firewall
- roles/ssh
- roles/updates
- group_vars/web/vault (encrypted file with a password)
- provision.sh
- README.md
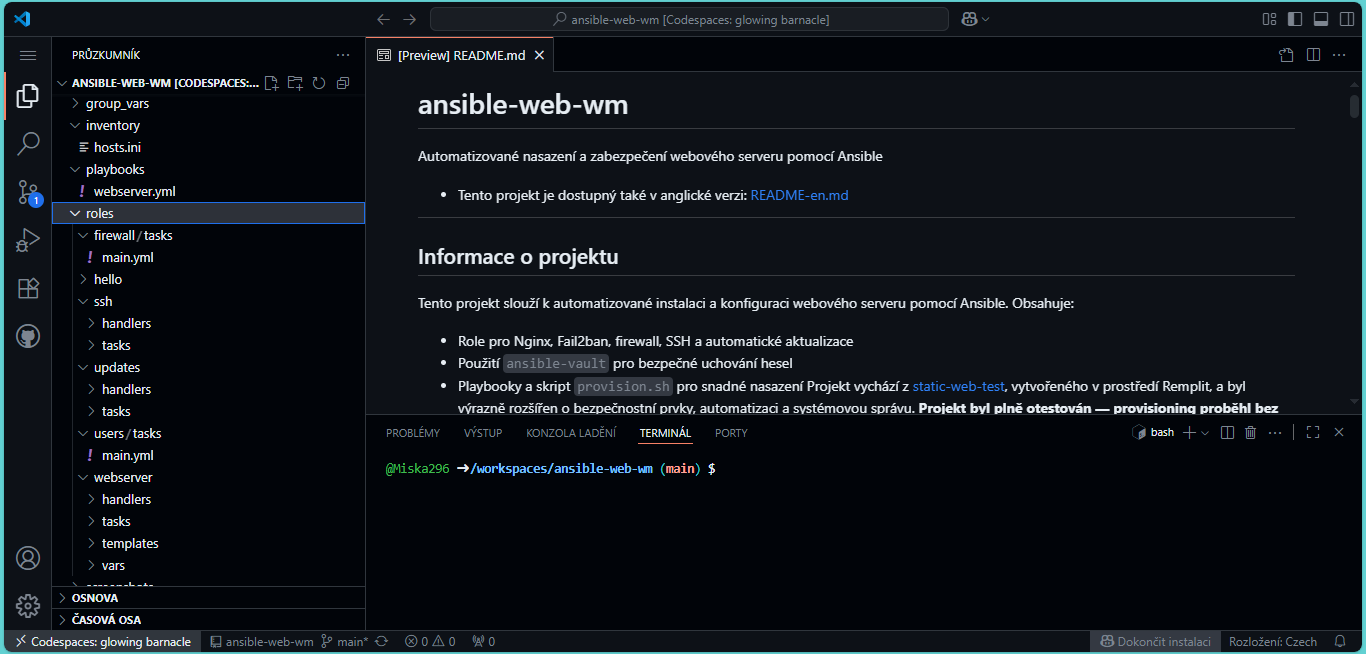 Project structure in Codespace
cz For the Czech version of this documentation, see README.md
Bonus features
- Automatic security updates:
```yaml
- name: Enable automatic security updates copy: dest: /etc/apt/apt.conf.d/20auto-upgrades ```
- Web application available on port 80
- Webapp user created using a password from the Vault
Project status
- User management — Yes
- Password Vault — Yes
- Security (firewall, fail2ban, ssh) — Yes
- Automatic updates — Yes
- Webserver — Yes
- Provisioning — Yes, without mistakes
Live demo: View the project on GitHub Pages
Testing and verification of functionality
After completing the provisioning, please perform the following checks:
- Webserver is running:
systemctl status nginx - Open ports:
ss -tuln | grep :80 - The firewall does not block communication:
ufw status - Fail2ban protects the server:
fail2ban-client status - The Ansible playbook ran without errors:
Watch the output in the terminal –
failed=0confirms success.
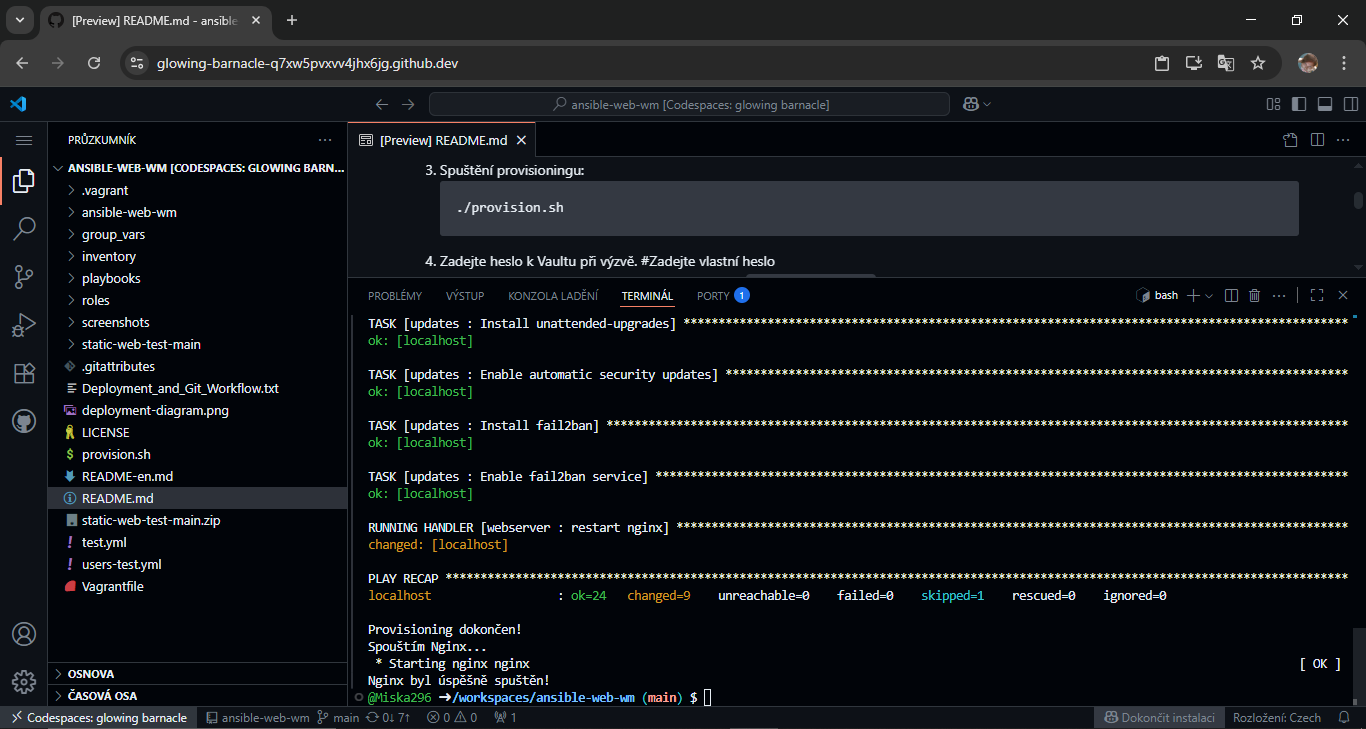 Successful completion of provisioning (
failed=0)
The web page has been successfully deployed and is available at the public address in GitHub Codespace: glowing-barnacle-q7xw5pvxvv4jhx6jg-80.app.github.dev
Warning: The public URL works only after the successful provisioning and publication of port 80 in the Codespace.
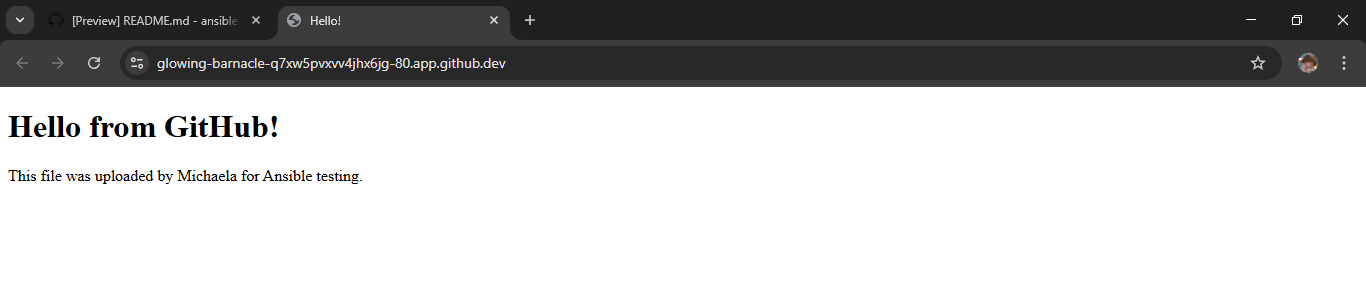 The displayed page after deploying NGINX
If the page displays “Hello from GitHub!”, the deployment was successful.
Video presentation of the project
It shows the complete run of the script provision.sh, deploying the web server using Ansible and verifying its functionality.

Related project
This project is based on the original repository static-web-test, where a static web application was created using the Replit platform. The project ansible-web-wm has been supplemented with automation, security features, and extensive testing.
Troubleshooting
1. No port has opened
If ports 22 (SSH) or 80 (HTTP) are not open after provisioning, please check the following:
- Firewall (UFW)
Check the status of the firewall:sudo ufw status- If active, allow the necessary ports:
sudo ufw allow 22
sudo ufw allow 80
sudo ufw reload
- If active, allow the necessary ports:
2. Ports are not available in Codespace
If ports 22 or 80 are not visible in the ‘Ports’ tab:
- Open the Ports tab in Codespace
- Click on “Add port”
- Enter
80and check ‘Public’ - After saving, a public URL will be displayed, e.g.
https://username-repo-80.app.github.dev - Open it in the browser and verify that the page loads
- Check that NGINX is listening on all interfaces (
listen 80,listen [::]:80)
3. NGINX is running but is not accessible.
Check the status of the service:
systemctl status nginx
Check if it is listening on port 80:
ss -tuln | grep :80
Tip: Always verify that the port is marked as ‘Public’ in Codespace, otherwise the page won’t be accessible externally.
4. SSH access restricted
If you have disabled login using a password or root user, make sure you have the SSH key properly set in sshd_config.
5. Provisioning has been completed, but the changes have not been applied
Try to run the provisioning again:
./provision.sh
6. The web is not available from the outside
If the webpage does not display through a public URL (e.g., in Codespace), check:
- NGINX configuration
- Make sure that in the template
nginx.conf.j2there is:server_name _; listen 80; listen [::]:80; - This ensures that the server listens on all interfaces and is not limited to
localhost.
- Make sure that in the template
- Restart the service
- In an environment without
systemd, use:service nginx restart
- In an environment without
- Port publication
- Manually add port 80 in the tab in Codespace „Ports“ and set it as „Public“.
- Firewall
- Check that ports 22 and 80 are allowed:
sudo ufw status
- Check that ports 22 and 80 are allowed:
Best Practices
- Use
DEBIAN_FRONTEND=noninteractiveto suppress interactive prompts when installing packages. - Use
ansible-vaultto securely store sensitive information. - After each provisioning, check the status of the services (
nginx,fail2ban,ssh) and the open ports. - Use
server_name _in the NGINX configuration if you want the server to respond to requests from any domain or IP address. →server_name localhostrestricts access to only the local machine, which may block access in environments like Codespaces or when testing from the outside. - Add
listen [::]:80;for IPv6 support, which enhances availability in modern networks. - After each configuration change in NGINX, run the provisioning again and check the status of the service.
- Document the project structure, deployment diagram, and provisioning outputs.
- Keep the repository structure clean - avoid nested folders.
Future improvements
- Add automated testing using GitHub Actions
- Create a dynamic web interface for provisioning
- Add support for Docker-based deployment
- Implement logging and monitoring (e.g., Prometheus, Grafana)
- Translate documentation into more languages
Author
The project was developed by Michaela Kučerová
Version: 1.0
Date: July 2025
Last updated: September 2025
Build: OK
License
This project is available under the MIT license. See the file LICENSE.